Oculus Lab 3: The Monster
Table of Contents
In this lab, we’ll focus on the main antagonist of our game: the monster. Before we jump into it, let’s list out all the things that this monster has to do:
- Move towards the player while avoiding obstacles.
- Attack the player when it’s close enough.
- Die after getting shot, then disappear.
- Do all of the above with appropriate animations and sounds.
After initializing the new project with the skeleton, you will need to install the XR packages again through Window > Package Manager > (on the top) Packages: Unity Registry:
- Oculus XR Plugin
- XR Plugin Management
- XR Interaction Toolkit
The Monster Prefab
Open the provided Lab scene in the assets folder. Within the prefabs folder, we’ve provided a Monster prefab for you already. Go ahead and drag it into the scene and turn it around to face the player.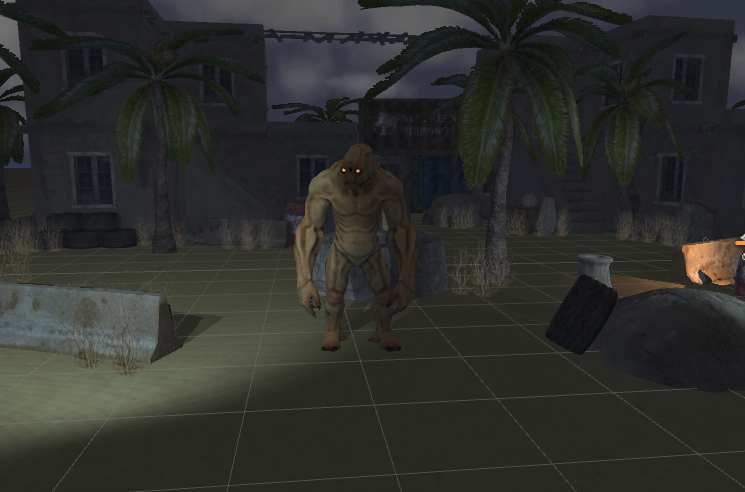
As you’ll notice, the monster gameobject has two children already: hips and mesh_1. mesh_1 contains the mesh renderer that gives it the look it has, while the actual mesh itself is contained in the tree-like structure within hips, which contains the positions of all the bones in our monster’s skeletons (also called the rig).
We won’t go into the 3D modeling details. If you wish to learn more, UCBUGG is a well-established and fantastically run decal on the subject. We’ll focus instead on how to use this 3D model in our project.
Creating the Navmesh
Moving our monster is a deceptively challenging task when there are obstacles in the way. There are a lot of ways to do it (if you’ve taken CS61B, you’ll remember Dijkstra’s algorithm or A* search, which can be adapted to work in this situation), but actually implementing one would be outside the scope of this course. Luckily, Unity already has a navigation infrastructure in place that we can take advantage of.
What we’re going to do is build what’s called a navigation mesh, or navmesh for short. A navmesh is a map of the environment that enables supported agents, called navmesh agents, to traverse the environment. By building this map ahead of time, agents won’t have to repeatedly compute where they can and cannot go while the game is running.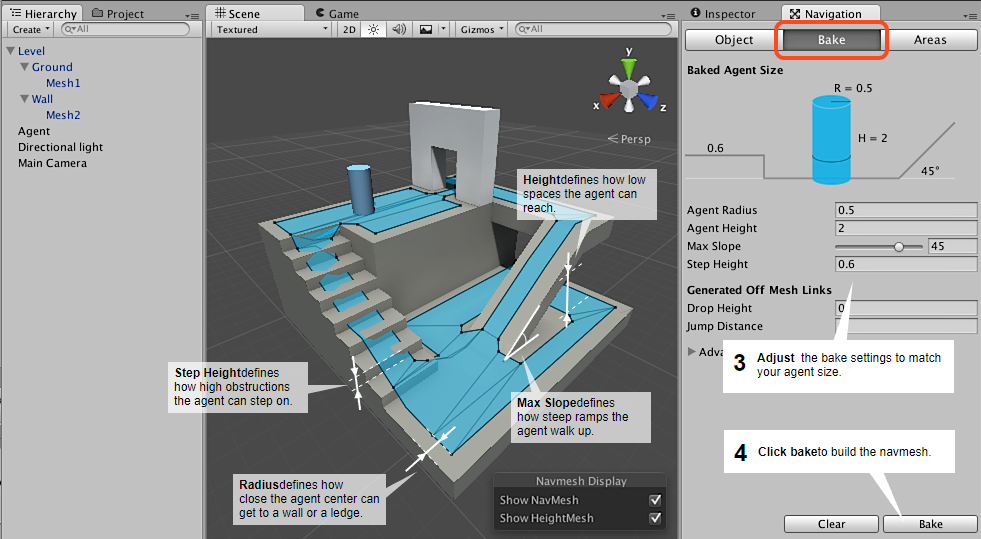
You can read more about Unity’s navigation system here.
Next, open up the navigation window via Window > AI > Navigation and click on the “Bake” tab. This tab is where we can “bake” a navmesh into the environment for later use. Navmeshes are built given certain assumptions about the agent traversing it. As you can see in the “Baked Agent Size” section, Unity assumes our agent is a cylinder of certain radius and height.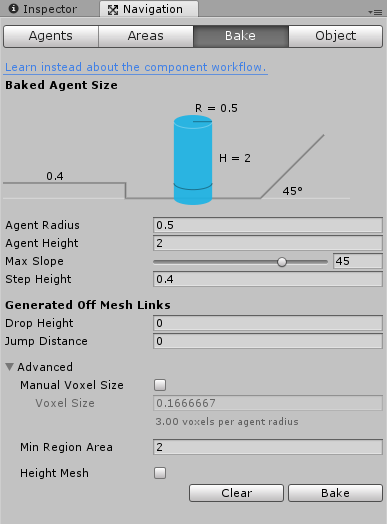
We’ll only change one of these settings: set Agent Radius to 0.4 to better fit our monster. Then hit bake. You should see the map get covered in blue, representing all the traversable parts of the map.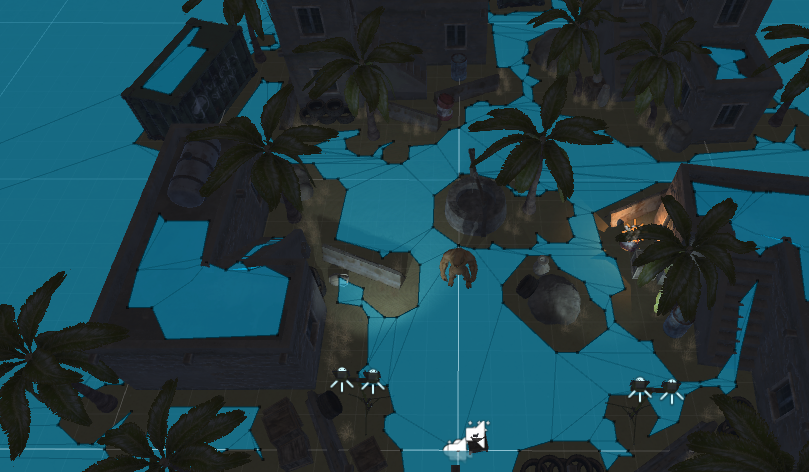
Moving the Monster
Now that we have a navmesh, let’s turn our monster into a nav mesh agent and move it. Add a “nav mesh agent” component to our monster gameobject. This component interacts with the navmesh and allows whatever object it’s attached to to move intelligently.
Change Speed to 0.75 (you don’t want the Monsters sprinting at you) and change Stopping Distance to 1.3. This indicates that once the monster gets within Stopping Distance of its target, it’ll stop moving - this will be useful once we incorporate attacks. Next, notice that we’re using the Humanoid agent type. Go to the Agents tab in the navigation window and change Radius to 0.4 to match the radius we used for the navmesh.
Next, create a new script called “Monster” that we’ll use to control all functionality of the gameobject. Start off by creating and initializing variables for the player, nav mesh agent, and audio source component. Note that in order to utilize the NavMeshAgent class, we’ll have to import UnityEngine.AI.
using System.Collections.Generic;
using UnityEngine;
using UnityEngine.AI;
public class Monster : MonoBehaviour {
public GameObject player;
private NavMeshAgent navMeshAgent;
// Use this for initialization
void Start () {
navMeshAgent = GetComponent<NavMeshAgent>();
}
// Update is called once per frame
void Update () {
}
}
Then to get the monster moving, all we have to do is add this line to Update(), which will repeatedly set the destination of the monster to the player’s location.
navMeshAgent.SetDestination(player.transform.position);
}
In Unity, add this script to the Monster gameobject. For the player field, drag in Main Camera which can be found under XR Origin > Camera Offset, which represents our headset. Press play, and you should see the monster move towards you.
It looks a little odd to see our monster power-slide to its destination, so we’re going to add in animation support. Add an Animator component to the Monster. We’ve provided a Controller for you in Assets > Animations > Monster and an Avatar (the mapping between Unity’s normal bone structure and a special one) in Models > Monster > MonsterAvatar. Drag those into their fields.
Take a look at the monster controller in the Animator window. It’s a little more complicated than the gun controller, but not by much. Notice that we start off in the “Walking” state. If you press play now, the monster should walk towards you with a lumbering walk animation.
Before continuing, we’re going to add in sound support. Add an audio source component to the Monster and disable Play On Awake. Then in Monster.cs, declare/initialize it properly along with three audio clips, which we’ll use throughout the lab. Play the spawnClip in Start() to announce that this Monster has spawned.
private AudioSource audioSource;
public AudioClip spawnClip;
public AudioClip hitClip;
public AudioClip dieClip;
void Start () {
navMeshAgent = GetComponent<NavMeshAgent>();
audioSource = GetComponent<AudioSource>();
audioSource.PlayOneShot(spawnClip);
}
In Unity, you can find and fill in the appropriate clips in Assets > Sounds. The spawnClip is grrr1, hitClip is hit1, and dieClip is (very surprisingly) called die.
Attacking the Player
The next thing we want to do is have the monster begin attacking the player once it gets in range. Looking at the monster controller again, we see that the state transitions from Walking to Attack when the “Attack” bool parameter is set to true. Let’s do just that in our Monster.cs script.
We’ll need to add a check to make sure we’re in range to attack. First, add a public attackRange variable and set it to 1.3 in the editor. Then add and initialize the animator variable.
public GameObject player;
public float attackRange;
private NavMeshAgent navMeshAgent;
private AudioSource audioSource;
private Animator animator;
...
// Use this for initialization
void Start () {
navMeshAgent = GetComponent<NavMeshAgent>();
audioSource = GetComponent<AudioSource>();
audioSource.PlayOneShot(spawnClip);
animator = GetComponent<Animator>();
}
...
}
Then in update, compute the distance between the monster and the player. Since we only care about the 2D distance between the two, we’ll zero out the y component before computing the magnitude.
navMeshAgent.SetDestination(player.transform.position);
Vector3 distanceVector = transform.position - player.transform.position;
distanceVector.y = 0;
float distance = distanceVector.magnitude;
}
Use this distance to check whether or not we should transition into attacking.
...
if (distance <= attackRange) {
animator.SetBool("Attack", true);
}
}
Save your work and try it in the editor. The monster should walk towards you, then stop some distance away and start hitting you with its fists. Whenever it hits you, an error should also pop up in the console:
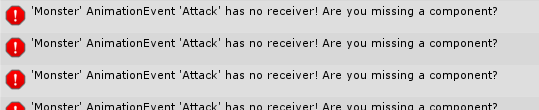
Unity allows you to hook up animation events to certain points in time within an animation. These events take in a function name. When the animation plays in-game and reaches that point in time, Unity will look for that function and call it. In this case, there’s an animation event attached to the moment the monster’s fists hit the ground, with function name “Attack”. Since we don’t have a function called “Attack” yet, it raises this error. Stub in the Attack() function to fix this; we’ll just play the hitClip sound for now.
}
Shooting the Monster
Now that the monster can attack us, it’s only fair that we are able to fight back. On a high level, this is the procedure for shooting the monster:
- Player shoots gun. Invisible ray comes out of the gun and travels forward.
- Ray hits an invisible collider on the monster, which calls a function.
- Monster triggers its hurt animation, takes damage.
- If monster loses all its health, kill it.

Next, switch to editing the Gun.cs script. We’re going to add a raycast check to Fire() to check if we’ve hit a monster. I won’t pretend to be able to explain raycasting better than Unity itself, so before looking at the code below, watch the first minute and a half of this video. Raycasts can be confusing intuitively, so don’t be afraid to ask for clarification!
audioSource.PlayOneShot(audioSource.clip);
particleSystem.Play();
RaycastHit hit;
Vector3 origin = particleSystem.transform.position;
Vector3 direction = particleSystem.transform.right;
if (Physics.Raycast(origin, direction, out hit, 100f)) {
}
}
We’re using the position/rotation of MuzzleFlashEffect (the gameobject particleSystem is attached to) for the origin of the raycast since it sits at the front of the gun where the bullet would come out of. The direction is set to its “right” direction because it’s the red arrow (which corresponds to the right direction) that points out of the gun barrel. We’ve defined a hit object to hold any data that comes through, and the ray itself lasts for 100 meters.
The end result is that this if case returns true only if the fired raycast hit something, with whatever collider it hit stored in the “hit” variable. We’ll now check if that collider belonged to a monster. If it does, we’ll extract the Monster script from it and call an appropriate function.
...
if (Physics.Raycast(origin, direction, out hit, 100f)) {
GameObject hitObject = hit.collider.gameObject;
if (hitObject.CompareTag("Monster")) {
print("Hit a monster!");
}
}
}
In Unity, assign the “Monster” tag to the monster gameobject, creating it if necessary. Press play, and shoot your gun at the monster. Does it trigger the print message?
Hurting the Monster
Before we start replacing the print message with proper damage-taking interaction, we need to go into details on the monster’s various gameplay states. Our monster can be in one of three states at any given point in time:
- ALIVE: In this state, the monster will move towards and attack you.
- DYING: In this state, the monster has taken enough damage and is in the midst of doing its death animation. It will no longer move towards you and cannot take further damage.
- SINKING: In this state, the monster has finished its death animation and is now sinking through the ground before finally getting removed from the game.
public enum State {
ALIVE, DYING, SINKING
}
public State monsterState = State.ALIVE;
...
}
Our monster should only be moving around if it’s in the ALIVE state. Encapsulate the code you’ve written in Update() so far in an if block checking for this.
if (monsterState == State.ALIVE) {
}
}
Next, we’re going to implement the monster’s health. Add a public int maxHealth (set that to 100 in Unity) and private int currHealth to the class. Initialize currHealth properly in Start(). Finally, stub in a public Hurt() function that we’ll be using soon.
...
currHealth = maxHealth;
}
...
public void Hurt(int damage) {
}
Now switch back to editing Gun.cs. Add a public int damage, which will represent how much damage each bullet deals to a monster.
Set it to 20 in Unity. Then in the raycast section, remove the print statement. In its place, extract out the monster script from the monster gameobject, and call the Hurt() function with the newly defined damage var as the parameter.
GameObject hitObject = hit.collider.gameObject;
if (hitObject.CompareTag("Monster")) {
Monster monsterScript = hitObject.GetComponent<Monster>();
monsterScript.Hurt(damage);
}
}
Switch again to editing Monster.cs so we can fill out the Hurt() function. It’s fairly straightforward: we first check if the monster is still alive, and if so call the proper animation trigger (which you can view in the Monster’s animation controller. We also subtract the damage taken from its current health, and if it dips below 0 we’ll call Die(), which we’ll stub in with a print statement for now.
if (monsterState == State.ALIVE) {
animator.SetTrigger("Hurt");
currHealth -= damage;
if (currHealth <= 0)
Die();
}
}
void Die() {
print("Monster died.");
}
Try it out now. You should be able to shoot the Monster and trigger a small stagger animation, and after shooting it five times see the print statement (make sure to set Max Health to 100 in the Monster GameObject’s Monster component).
Killing the Monster
Filling in the Die() function is fairly straightforward:
- Set the state appropriately.
- Play the dying sound effect (dieClip).
- Stop navigating towards the player.
- Trigger the appropriate animation.
monsterState = State.DYING;
audioSource.PlayOneShot(dieClip);
navMeshAgent.isStopped = true;
animator.SetTrigger(“Dead”);
}
If you try the game now, you should be able to see all this happen after shooting the monster five times! You should also notice an error message in the console:

This is an animation event hooked up to the end of the death animation. If we were to just let the monster sit there forever, the corpses would end up glitching into one another and lagging the game. So we’re now going to use this animation event to make dead monsters sink through the floor and then disappear after dieing. Stub in the public StartSinking() function.
}
There are a couple things we need to do in this function:
- Set the state appropriately.
- Disable the navigation component. The nav mesh agent component overrides movement control from other sources, so in order to make our monster sink through script we must disable this component first.
- Set the monster to be destroyed after a set amount of time. We’ll use 5 seconds, which should be long enough for the monster to fully move through the floor.
monsterState = State.SINKING;
navMeshAgent.enabled = false;
Destroy(gameObject, 5);
}
Next is to make the monster actually sink, which we’ll do in the Update() function. Add a public float sinkSpeed, which will represent how quickly the monster sinks through the ground.
Then in Update(), add an else if block for when our monster is in the sinking state. In it, we’ll calculate how far down the monster needs to move this frame and translate it downwards that much. Time.deltaTime returns the time between this frame and the previous.
float sinkDistance = sinkSpeed * Time.deltaTime;
transform.Translate(new Vector3(0, -sinkDistance, 0));
}
Set sinkSpeed to 0.15 in Unity, and give it a try! Killing the monster should now make it sink through the floor before disappearing from the scene.
Check Off
This is the end of lab 3. To check off, show a facilitator that your monster will do the following: